Ever need to have a test database on hand that you can allow others to query “real like” data without actually giving them actual production data values? In SQL Server Management Studio (SSMS) 18.0 preview Microsoft introduces us to Static Data Masking. Static Data Masking is a new feature that allows you to create a cloned copy of your database and replace sensitive data with new data (fake data, referred to as masked). You can use this for things like development of business reports and analytics, trouble shooting, database development and even sharing data with outside teams or third parties. Unlike Dynamic Data Masking added in SQL Server 2016, this feature does not hide the data with characters, rather it replaces the entire value. For example with dynamic data masking the name Peter = Pxxxx, whereas Static Data Masking changes Peter to Paul. This makes it very easy to use in place of production. Let’s see it in action. If you are not on a newer version on SSMS, don’t worry, you can download it
To get started Right click on the database you want to clone and mask and go to Tasks. Then down towards the bottom you will see Mask Database (Preview). Click on that.

In this example I am using the AdventureworksDW2016CTP3 example database. Exploring the subsequent window that pops up you can see there are three main steps to complete. First is to choose which tables and fields you want to mask and apply the masking type you want. You’ll note it gives you the ability to filter for specific columns like Social Security Number.. Using this will narrow down the list of fields you need to configure, or you can simply mask all columns in the database. For my example we will be using just one table, DimEmployee. Secondly, choose the location of the backup file. Static Data Masking uses a backup (BAK) files to create the cloned masked database. We will use the defaulted location for step two. The third step is to name your masked database. Note highlighted in yellow that the processes is fully logged and that log is linked in this screen.

To configure masking on the DimEmployee table, I clicked the arrow next to the table name to expand the column list. It gives me the option to mask all columns in the table, but to keep it simple we will keep it to three. Base Rate, Department Name and Email Address.
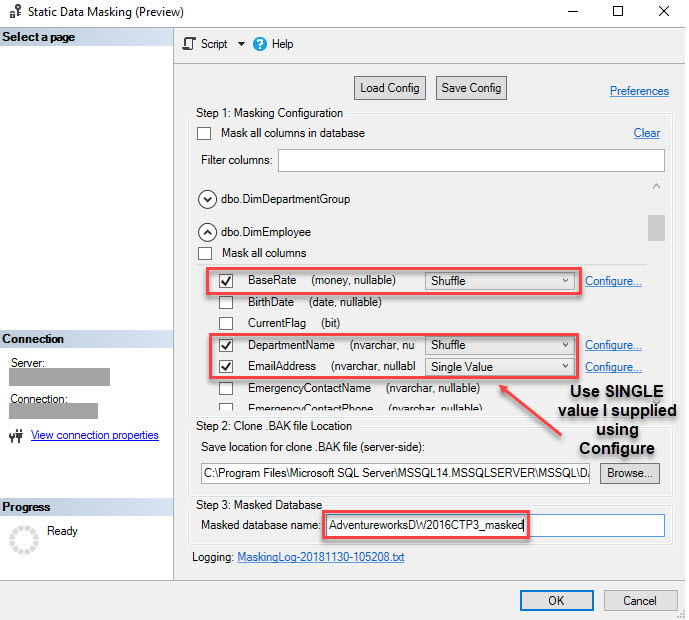
You’ll several options to choose from described below per MSDN. We choose Shuffle for BaseRate and DepartmentName and used a supplied replacement value, Single Value, for email address.

| Masking Function | Description |
| NULL Masking | NULL masking replaces all the values in the column with NULL. If the column does not allow NULL values, Static Data Masking tool will return an error. |
| Single-value masking
|
Single-value masking replaces all the values in the column with a single fixed value, this value is specified by the user. |
| Shuffle masking
|
All the values in the column are shuffled to new rows. No new data is generated. Shuffle masking provides the option to maintain NULL entries in the column. |
| Group Shuffle masking
|
Group Shuffle binds several columns together in a shuffle group. The columns in a shuffle group will be shuffled together. |
| String Composite masking
|
String Composite masking generates random strings along a pattern. It is designed for strings that must follow a predefined pattern to be a valid entry. For example, American social security numbers have the format 123-45-6789. The syntax for String Composite masking is specified in the dialog box where the user has to enter the pattern. |
When choosing the Single Value or String Composite Masking options, click on Configure to enter what value you want that to be. Check out MDSN for other value options you can use such as string patterns. After clicking Configure, a window will appear for you to enter the new value.

Lastly, in step three, I named the database AdventureworksDW2016CTP3_masked. Then hit OK. The process took a little longer then I thought it would but given it is replacing a lot of data the wait wasn’t too bad.
Once complete you will get a Masking was successful message. Note to create the new cloned database the system took a back up. Here it reminds you where that back up is stored so you can remove it. It’s the same location provided in step 2 above.

If you refresh the databases in Object Explorer you will see a new cloned database was created based on the name we supplied.

Now let’s see exactly what this accomplished for us. Querying the original Employee table and the new clone Masked employee table.
SELECT TOP (1000)

       'Original' as MaskTest

      ,[FirstName]

      ,[LastName]

      ,[MiddleName]

      ,[BirthDate]

      ,[BaseRate]

      ,[DepartmentName]

      ,[EmailAddress]

  FROM [AdventureworksDW2016CTP3].[dbo].[DimEmployee]


    SELECT TOP (1000)

       'Masked'as MaskTest

      ,[FirstName]

      ,[LastName]

      ,[MiddleName]

      ,[BirthDate]

      ,[BaseRate]

      ,[DepartmentName]

      ,[EmailAddress]

  FROM [AdventureworksDW2016CTP3_masked].[dbo].[DimEmployee]
It’s very easy to see what it has done. It simple Shuffled the data around and replace values with random but real data values in the BasePrice and DepartmentName columns. For EmailAddress it changed all of the fields to the same value I supplied. I can see this as extremely useful in report development and analytics and it was very easy to accomplish.

A couple things I ran into while playing around with this new feature was that identity columns are not supported, and you will see a red x next to those fields. Additionally, if you choose Group Shuffle you must choose it for more than one field in the table. Other than these, there are only are a few more limitations worth mentioning. It cannot be used with temporal tables, memory optimized table, computed columns or geographical data types.

All in all, this process was really easy to get setup. I caution you though before doing this make sure you have enough disk space for the backup to be created and the new database. While testing this I made several copies which consumed quite a bit of space. Even when it failed the files were created. Be sure to clean up those .bak files after you’re done.