If you have setup a Windows Azure Virtual Machine running SQL Server you may have noticed that you might not be able to connect to the SQL Server running on the machine by using SQL Server Management Studio on your workstation (desktop, labtop, etc) from your home or office.
This is normal and setup this way by default.
First I’ll explain the why, then how to change this.
The Why
The reason that this is disabled is that Microsoft doesn’t want to leave the SQL Server exposed to the public Internet where people can and will try to break into the SQL Server instance, pretty much 24 hours a day, 7 days a week until they get into the server. Microsoft is doing you a favor by not letting this happen by default.
Fixing It
Now, assuming that you want this access there’s a couple of ways to set this up.
Site to Site VPN
The first (and best) is to setup a site to site VPN between your office and the Windows Azure network. Now this requires a bit of configuration and a little understanding of networking (and access to make changes to your office’s router). If you aren’t the IT guy/gal, you’ll need to talk to the IT guy/gal in order to get this done. If you are the IT guy/gal and you have access to the router, Microsoft has provided some scripts to make this much easier to complete.
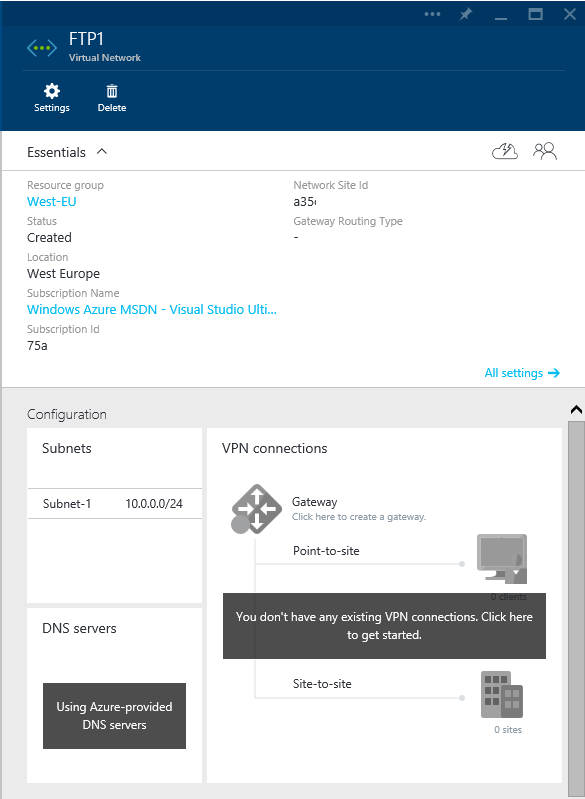
The first thing you’ll want to do it connect to your Azure account and browse to the virtual networks. Select the network that you want to modify and you’ll get the properties of the network to pop out on the next blade. It’ll look something like this.
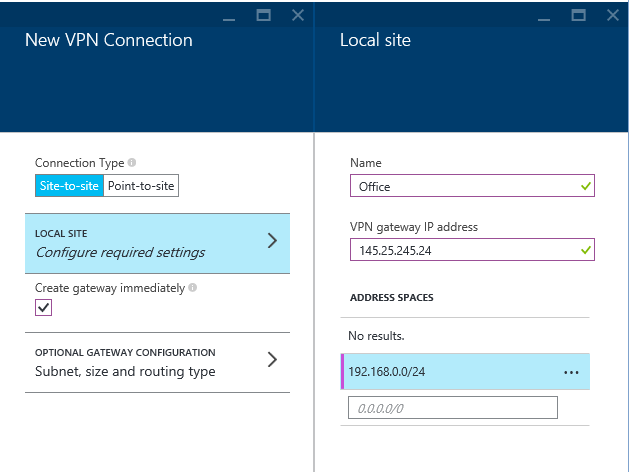
You’ll want to click on the VPN Connections section on the right, select site-to-site, check the “Create gateway immediately” check box, then click on Local Site and enter a name and the public IP for your office network as well as tell Azure what all the IP Subnets for your internal office network are. It’ll look something like this, then click OK to get back to the “New VPN Connection” blade.
Click the “Optional Gateway Configuration” button and change the routing from Dynamic to Static. If you want to change the IP subnet for the private side of the VPN within Azure you can do here as well. You can also select the gateway size between Normal and High performance, but the high performance one will probably cost more money. If you are a large enterprise you probably need the high performance option, if you are a small/medium business the normal gateway will be just fine. Click OK all the way back down to the virtual network blade and wait for the network changes to be made. This can take 5-10 minutes for the VPN endpoint to be created and spun up.
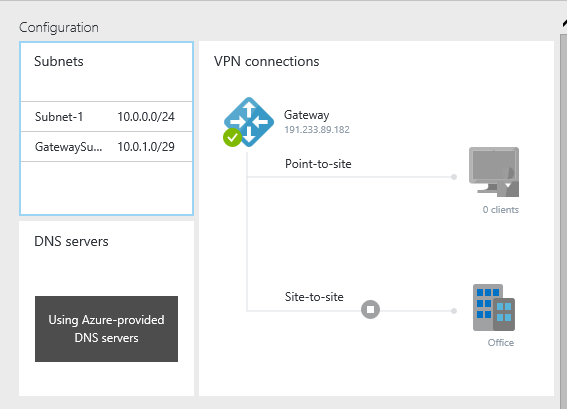
After Azure is done doing it’s thing the configuration section of the portal will look something like this.
Click on the “VPN Connections” panel and a new blade will open. At the top you can download the script to configure the office router to use the VPN connection.
Point to Site VPN
If you don’t want to setup a site to site VPN so that all office users can access Azure, or if you don’t have access to do so, you can setup a VPN from your specific machine to the Azure cloud. Just keep in mind that this option doesn’t support any user level authentication so if you give someone else access to your Azure network this way, you won’t be able to remove their access without revoking access for all users and setting everyone up from scratch.
The first thing you’ll want to do it connect to your Azure account and browse to the virtual networks. Select the network that you want to modify and you’ll get the properties of the network to pop out on the next blade. It’ll look something like this.
You’ll want to click on the VPN Connections section on the right, select Point-to-site, and tell Azure what all the IP Subnet to use for people who VPN in should be. Any private IP subnet will work as long as you haven’t used it in one of your Azure networks already. The portal will verify that the IP subnet you enter will work. Something like “192.168.5.0/24″ should work fine.
Click OK all the way back down to the virtual network blade and wait for the network changes to be made. This can take 5-10 minutes for the VPN endpoint to be created and spun up.
After Azure is done doing it’s thing the configuration section of the portal will look something like this (but with the Point to site icon in color).
Click on the “VPN Connections” panel and a new blade will open. At the top you can download the VPN software that you will need to connect your computer to the Azure network securely.
Opening Access to the Virtual Machine from the Public Internet
If for some reason you don’t want to VPN in, first you need to figure out why you don’t want to do this. If there’s a really good reason to not VPN in, then continue with setting up direct Internet access to the SQL Server. But keep in mind, when I talk to clients about this sort of thing, there is almost never a good reason to setup access to the VM directly from the Internet.
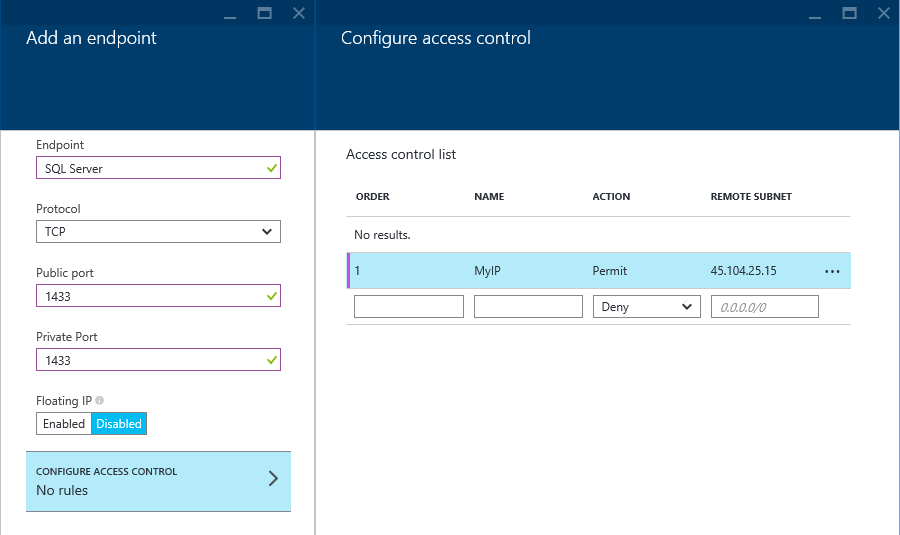
To open an endpoint browse to the VM in the Azure portal. Open the properties of the VM in the Azure Portal, then click the “All Settings” option. Then select “Endpoints”. It’ll look something like this.
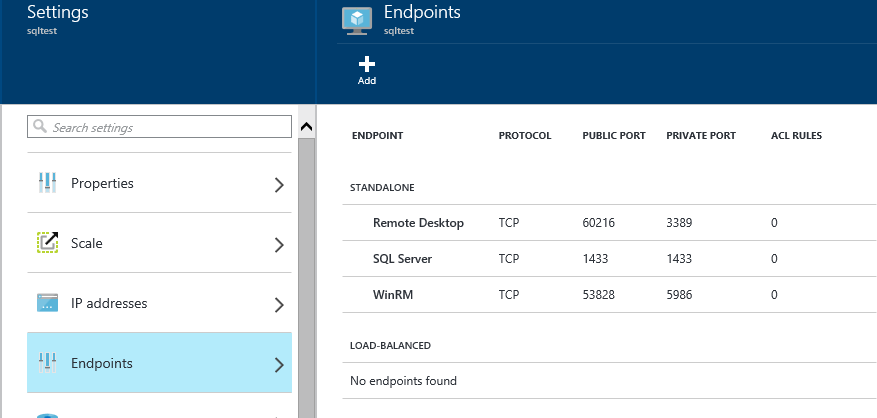
If you see a “SQL Server” endpoint with 0 ACL Rules then the work is half done (shown above). If there are ACL rules then you should be finished unless you need to add more ACL Rules.
If there is no SQL Server endpoint click the “Add” button at the top of the Endpoints blade. Name the endpoint “SQL Server”, select the protocol TCP, then set the ports to 1433 (or whatever TCP ports you want to use, but 1433 is the default). Select to setup access rules for whoever needs access and block any subnets that don’t need access and then OK back to the VM’s properties.
Now What
At this point you can connect to the SQL Server instance through whichever method you’ve setup. If you are using either VPN option you can just connect to the Virtual Machine’s network name. If you are going through the public endpoint (again this is REALLY NOT recommended) you’ll need to connect to the machines full DNS name.
Denny