Those of us that have worked on books have probably all run across the same problem at one time or another. When you are going through the book writing process, you always end up going back and wanting to add a code example, or a screenshot somewhere in the middle of the chapter, and you then have to go through and renumber all of the other code examples and images that come after that. Needless to say this is a pain to do, and can take forever if you’ve got a lot of images.
When I was working on the second edition of my book Securing SQL Server this was a major problem for me on several of the chapters in the book as I wanted to put new screenshots for SQL Server 2012 into the middle of the chapter, or there was some new feature that I was going to be talking about in the middle of a chapter, so new code samples were needed.
As I was going through the chapter I was thinking, “wouldn’t it be nice if Word would handle all this for me?” I was able to find a way to do this, using the native bullet point feature within Word. It took a little tweaking to my Word docs to make this work, but here’s what I did in case you run into this same problem.
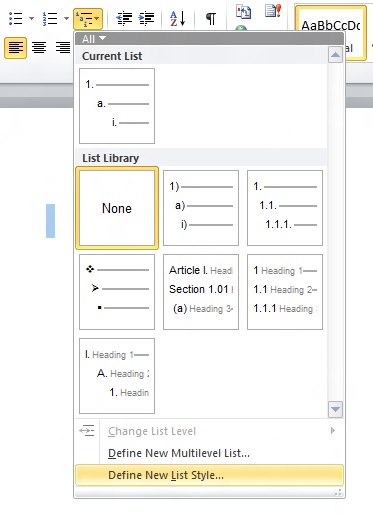
In my case I needed three different numbering systems. One for Images, one for Examples and one for Tables. To do this I had to create three new list styles within Word. To create a new list style you first need to click on the multilevel list button in the ribbon at the top of the document and then select “Define New List Style…” from the menu as shown below.
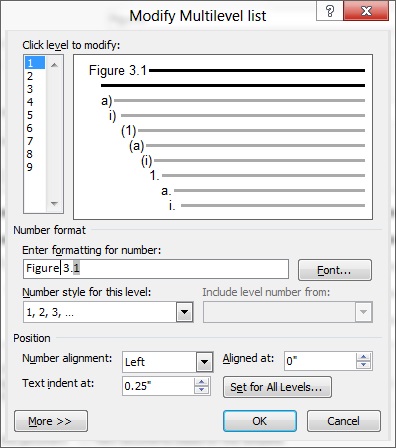
This will open the new list style editor. From here you can give the style a name, “Figures” in my case. Then click the format button at the bottom and select “Numbers” from the menu that opens. On this new page, shown below, you can setup the formatting that will be used for the list. In the “Enter formatting for number” section like I’ve done in the screenshot below. Don’t forget to set the “Number style for this level” option. In the formatting level you’ll see that I’m only changing level 1 as we won’t be using the child levels. In my numbering I’ve got it setup for Chapter 3 which you can see because the first figure number will be “Figure 3.1”.
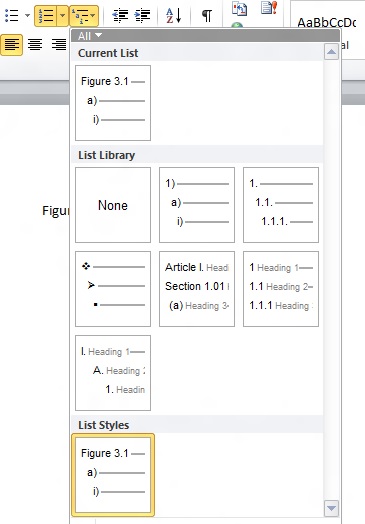
Click OK on this screen and then OK on the next screen as well. Now when you click on the multilist option in the ribbon you’ll see the Figures style as an option as shown below.
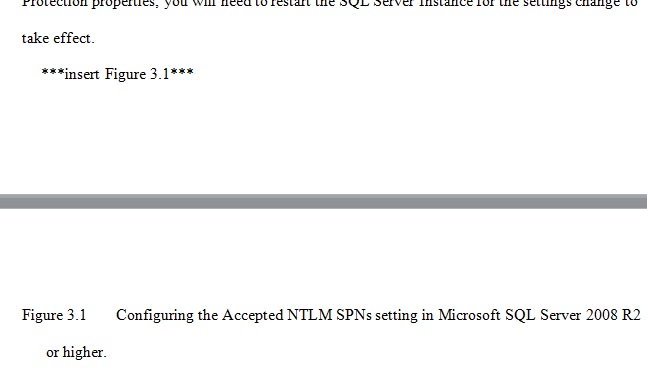
I then repeat this exact same process for Examples and Tables. Now when I’m doing my writing I can simply use the native feature to handle the numbering with the official number next to the caption. The end result looks like this.
To setup the reference to the figure we use the Cross Reference feature which can be found on the “Insert” tab of the ribbon. Simply put the cursor where you want to reference the number then click the cross reference button. This will pop up a list of all the Figures, Examples and Tables which exist within the document. Select the correct one and click the “Insert” button then the “Close” button. This will insert the reference into the document.
Once all your figures, examples, and tables are setup this way when you put one into the middle of the document everything will number itself correctly. If you need to insert a figure, example or table into the middle of the chapter all of the markers will be updated automatically, however the labels will not update automatically, so you’ll need to update them. Thankfully this isn’t all that hard to do. Simply do a select a (CTRL+A) then right click somewhere and select “Update Field” from the context menu.
Now if your publisher is like mine, then want [CAPTION] in front of the actual caption, but not within the actual chapter, so just before I send in the chapter I’ll edit the style and put the [CAPTION] in front of the Figure, Example and Table number. This is done by bringing up the menu shown in the first screenshot above, then right clicking on the style to edit. Then select the “Format” button at the bottom right and selecting “Numbers” from the menu that opens. Just put the change needed in front of the caption so instead of reading “Figure 3.1” it would read “[Caption] Figure 3.1:”. When you OK out of these windows, the actual image captions will be updated for the references won’t be updated. As long as you don’t do an update field (from the prior paragraph) then everything will look like you expect it to.
Hopefully you can use this trick when you are doing your writing.
Denny