
I wanted to name this post “I built NAT between Azure Virtual Machines, this makes me an Azure Networking God”, but that title seemed a little wordy. I was working with a client recently with an interesting Azure setup and some interesting requirements. The database tier for this application is using Azure SQL Managed Instance and will be part of a Failover Group which allows the SQL Managed Instance to be failed over between regions as needed. The web and application tier of the application will be within Azure Virtual Machines which will be protected with Azure Site Recovery (ASR).
For Disaster Recovery Tests and for an actual Disaster Recovery Failover we wanted to have to make as few networking changes as possible.
The Setup
In general, everything was pretty easy to get set up. We setup ASR, and ASR created an Azure virtual network (vNet) automatically as part of the Replication Setup process. We then set up our production Managed Instance and connected it to the production vNet. When we went to set up the Disaster Recovery SQL Managed Instance we ran into the root of our problem. In order to put the two Managed Instances within a Failover Group so that they could move data between them, the Managed Instances needs to be able to talk to each other. But the vNets had the same IP space, which means that we couldn’t peer the networks, as one of the requirements for connecting vNets to each other is that the networks need to have different IP Spaces.
In order to get around this requirement we configured a separate Azure vNet for the Disaster Recovery Managed Instance, which we could them peer to the production vNet. This then allowed the Production and the Disaster Recovery Managed Instances to be able to talk to each other.
The Big Problem
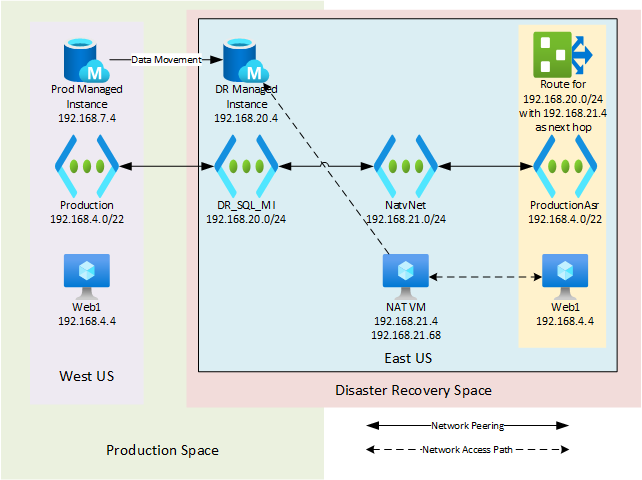
The next requirement was that the Disaster Recovery Virtual Machines needed to be able to connect to the Disaster Recovery Managed Instance with as few network changes as possible. We couldn’t just peer the ASR-created vNet to the Disaster Recovery Managed Instance vNet, as we’d have an IP conflict as the Disaster Recovery Managed Instance vNet can’t connect to two vNets with the same IP ranges. The solution to this was to create an additional vNet, with a machine in that vNet with the Windows Routing and Remote Access Service (RRAS) installed on it. This gives me a total of 4 Azure vNets peered together as shown in the picture below.

In order to make Routing and Remote Access Services (RRAS) happy it required having two subnets within the NatvNet and that machine needed to have two vNICs, with each vNIC in a separate subnet. I set up two Subnets in this vNet which were 192.168.21.0/26 and 192.168.21.64/26. The first vNIC gets the IP address of 192.168.21.4 and the second vNIC gets the IP address of 192.168.21.68. When RRAS is setup you have to specify an IP subnet range that will be used for the NAT. This range should be part of the IP range of the second vNIC. In this case, I used the range of 192.168.21.70-192.168.21.75. In order to make Azure happy (I’ll explain why in a minute) I needed to add the IP addresses that were being used for the NAT to the vNIC that was in the same subnet that they were from.
The final change in Azure that needed to be made was to create a routing table that directs the network traffic to the 192.168.20.0 network and use the next network hop for that being 192.168.21.4. This routing table is then applied to all the Subnets within the vNET that ASR created (called ProductionAsr in the image above). The network design and the VMs layout is shown below and should give a good view of the design.
The IP Requirement
One of the things to keep in mind that Azure network is a bit stubborn. When IPs are being used and those IP addresses aren’t known to the Azure environment, then the Azure environment doesn’t know which physical machine on the network to send the traffic to. I could easily see this in Wireshark when I ran Wireshark on the NAT server (the machine in the NatvNet subnet that was running.
I was using a machine in my ProductionAsr network with an IP address of 192.168.4.5. When I accessed 192.168.20.4 (the IP addresses of my Managed Instance) and looked at the network traffic (without having the IP addresses 192.168.21.70-192.168.21.75 assigned to the vNIC) I could see the network traffic going from 192.168.4.5 to 192.168.21.4, and I could see the network traffic going from 192.168.21.68 to the Managed instance IP address of 192.168.20.4, but the network traffic wasn’t coming back from the Managed Instance.
I did some additional testing by putting a Virtual Machine in the Managed Instance network and gave it an IP address of 192.168.20.5. When I installed Wireshark on this machine I could see the traffic coming to the machine, and I could see the machine sending the traffic back to 192.168.21.68, but it was never arriving at that machine. I noticed that it wasn’t actually using 192.168.21.68, but it was instead sending the traffic from the NAT machine to the Managed Instance network using 192.168.21.70. So on a hunch, I added 192.168.21.70 as an IP address which the server on the NatvNet could use. About 15 seconds after the Azure Portal said that it had made the change, I was able to make my connection to the Managed Instance as I needed to.
Final Configuration
The final setup of this was a bunch of Virtual Machines in a vNet. These machines were all protected with ASR. For the database we’re using an Azure SQL Managed Instance which is setup in a Failvoer group for Disaster Recovery.
With this NAT configuration we were able to have our SQL Managed Instance data movement between the two instances, while allowing the production servers to access either SQL Managed Instance. The Disaster Recovery Virtual Machines were able to access the SQL Managed Instance when doing a DR test, or in a DR failover. In the DR test requires that we need to be able to write to the DR Managed Instance we can do this by simply removing the DR Managed Instance from the failover group and putting a host file entry so that the production server name resolves to our DR Managed Instance IP address. This connects all the Disaster Recovery VMs to the Disaster Recovery Managed Instance with just a couple of simple changes.
A Failover Event
For an actual failover event the failover process is even easier. The VMs are failed over using ASR. The SQL Database Managed Instance failover group is failed over. And that’s is. At that point everything is failed over and working.
If you’d like to talk more about setting up your cloud environment, we’d love to set up a meeting with you.
Denny
3 Responses
Interesting, and useful. I would however convey my own opinion that this level of customisation defeats the objective of DR testing IMO… it certainly gets a DR copy of data available for testing, but the ultimate solution looks nothing like the production failover in the end…. so it doesn’t actually prove your DR will work when really needed. IMO the only true test of DR is a complete production level failover.
That wasn’t an option in this case. The client didn’t want to have any downtime to the production system or changes to the production environment when doing a DR test. So in this case a little creativity was needed.