Configuring Bitlocker on Windows VMs is pretty straightforward in most cases. Simply install the disk encryption extension on the VM and you are done. However, when ASR is in use for VM replication to another region (typically for disaster recovery) there are a few extra things that need to be done to ensure that everything will work properly. If you don’t set up the disk encryption extension properly, when you restart your Azure VMs in your failover region, you’ll be treated with this lovely error message (which you won’t see until you configure boot diagnostics and view the console): Plug in the USB drive that has the BitLocker key.

Needless to say, it will be a little difficult to plug in a USB drive to an Azure Virtual Machine (if you can figure out how I’m all ears). This can be fixed without removing ASR. It just takes a little reconfiguration of the VM, plus a little change to ASR.
Thankfully solving this is a pretty straightforward process. First remove the disk encryption extension from the virtual machine. This will force the machine to decrypt.
The next thing to do is to create an Azure KeyVault in both the primary Azure region and the secondary Azure region. This is most easily done with PowerShell as you need to Enable the KeyVault for disk encryption using the parameter shown in the example below.
KeyVault Setup
New-AzKeyVault -Location "East US" -ResourceGroupName {KeyVault Resource Group Name} -VaultName {Key Vault Name} -EnabledForDiskEncryptionYou’ll need to setup some permissions for your KeyVault. Specifically you’ll need Create, Import, Delete, and List for Keys. You can either user the Set-AzKeyVAultAccessPolicy PowerShell CmdLet to set the permissions or the Portal GUI. You’ll need these permissions on both KeyVaults (the one in the region that the VMs are in, and the one in the region that is the failover region).

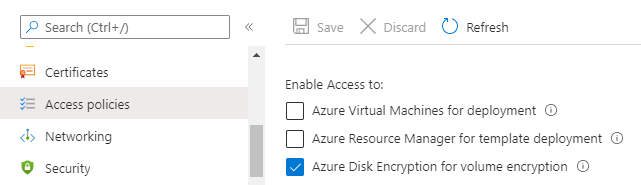
If you want to use an existing KeyVault that’s fine. Look in the properties of the KeyVault and see if the DiskEncrption option is enabled. You can also see this in the Azure portal by looking at the Access Policies for the KeyVault and seeing if the Disk Encryption is enabled. If it isn’t check the box and click save.
Once the key vault is set up the rest of the process is pretty straightforward. You need to create a key which BitLocker will use to encrypt the hard drive of the existing VM. I use a separate key per VM when I set this up. That way if a key is compromised, I just need to re-encrypt one VM instead of all the VMs. These keys can be made using PowerShell using the CmdLet Add-AzKeyVaultKey.
Add-AzKeyVaultKey -VaultName {Key Vault Name} -Name {VM Name} -Destination "Software"If you wanted to create one Key for each VM in your infrastructure you can do that with some quick PowerShell as well.
$VMs = Get-AzVM
foreach ($VM in $VMs) {
	Add-AzKeyVaultKey -VaultName {Key Vault Name} -Name $VM.Name -Destination "Software"
}
BitLocker setup
Once the keys are in place it is time to set up the disk encryption extension for the VMs. And you’ll notice why I’ve got the keys named with the name of the VM in just a second. If you have the names not matching the VM name, just adjust the Get-AzKeyVaultKey line below as needed with the correct -name value.
$KeyVaultName = {Key Vault Name}
$KeyVaultResourceGroupName = {Key Vault Resource Group Name}
$VMName = {VM Name}
$VMResourceGroupName = {VM Resource Group Name}

$KeyVault = Get-AzKeyVault -Name $KeyVaultName -ResourceGroupName $KeyVaultResourceGroupName
$KeyVaultKey = Get-AzKeyVaultKey -VaultName $KeyVaultName -Name $VMName

Set-AzVMDiskEncryptionExtension -ResourceGroupName $VMResourceGroupName -VMName $VMName -DiskEncryptionKeyVaultUrl $KeyVault.VaultURI -DiskEncryptionKeyVaultId $KeyVault.ResourceId -KeyEncryptionKeyUrl $KeyVaultKey.Id -KeyEncryptionKeyVaultId $KeyVault.ResourceId

Azure Site Recovery Setup
Once the VM encryption is set up, you’ll need to modify Azure Site Recovery (ASR) so that it copies the key over to the KeyVault in the failover site. To do this, open up the recovery vault which is used to replicate the virtual machines to the failover site. Once the recovery vault is open, select Replication items then click on the VM to open the VM properties.
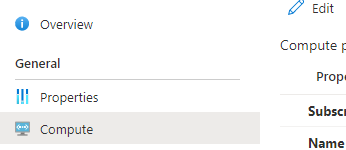
On the properties of the VM, select the Compute menu option and click the Edit button. The last option (unless they have changed the portal) is Disk encryption key vaults. On that line should be the key vault name that you put the keys on in the Source settings column. In the Target settings column, there will be a dropdown that should be set to Select. In that dropdown, you should see the KeyVault that is in your failover region. Select the correct KeyVault and click save.
With all this, you will have ASR setup to probably handle your BitLocker keys. You can see this by doing a test failover of one or more of the Virtual Machines, and they will come up as expected. You can also see the list of Keys in the failover KeyVault
Once the setup is done, you can remove your Access Policy from the KeyVaults if needed.
Denny